
DIY Silicone Bead Kit for Beginners: 2026 Starter Guide
Table of Contents
- What Comes in a Beginner Silicone Bead Kit
- Best Cord for Silicone Beads: What Actually Holds Up
- Silicone Bead Jewelry Making for Beginners: Your First Project
- Silicone Focal Beads for Keychains: Making Yours Stand Out
- Safety, Cleaning, and Keeping Beads Looking New
- Choosing the Right Bead Sizes and Colors
- DIY Silicone Bead Kit for Beginners: What It Costs
- Conclusion
- Frequently Asked Questions
Last Updated: September 11, 2026
What Comes in a Beginner Silicone Bead Kit
A diy silicone bead kit for beginners is a pre-assembled package of beads, cord, hardware, and sometimes tools, everything needed to complete a specific project. The best kits match bead quantities to cord length so you finish with a wearable piece, not leftover parts.
At Barkers Creative Designs, a typical starter kit includes 15 mm silicone beads, a silicone focal bead, spacers or abacus beads, a lobster clasp keyring or beadable wire, and occasionally a pen or crochet hook blank.
The real value is the pre-matched color palette and bead count, which removes beginner guesswork.
Kits vs. Buying Individual Supplies
Kits win for first-timers. Buying individual supplies makes sense once you know your preferred bead sizes, focal styles, and cord type. Before that, you'll spend more and end up with orphan beads.
| Approach | Upfront Cost | Best For | Main Drawback |
|---|---|---|---|
| Starter kit | Lower | First project, learning assembly | Limited color choice |
| Individual supplies | Higher | Repeat crafters, custom designs | Risk of mismatched components |
| Mixed bead bags | Lowest per bead | Building a stash over time | No hardware or cord included |
A DIY 10 inch Wristlet Kit at $8.00 covers the full kit path. A 15 mm Silicone Bead Mixed Bag at $7.00 covers the stash-building path.

Best Cord for Silicone Beads: What Actually Holds Up
The best cord for silicone beads is 1 mm elastic stretch cord for bracelets and wristlets, and 20-gauge beadable wire for keychains and cup charms. Elastic stretches with bead weight; wire holds a rigid shape that won't sag. The wrong cord is the most common reason a finished piece falls apart within a week.
Here's what actually matters when you pick:
- Elastic stretch cord (1 mm): Best for bracelets and stretchy wristlets. Knot with a surgeon's knot and a dab of clear glue; it stretches over a hand, then returns to shape.
- Beadable wire (20-22 gauge): Best for keychains, cup charms, and bar keychains. Holds shape, won't stretch out, and lets you form a clean loop at each end without crimp beads.
- Nylon-coated steel wire: Better for heavier focal beads, but harder to finish cleanly without crimp beads and a crimping tool.
- Leather or faux suede cord: Rustic look, but it slides through 15 mm beads, so you need a knot between each bead.
How Much Cord to Cut
Measure the finished length you want, then add 2 inches for knotting and trimming. For a 10 inch wristlet, cut 12 inches; for an 8 inch cup charm, cut 10 inches. Add another half inch if you're double-knotting elastic, cutting short forces a restart, and over-cutting costs almost nothing.

The Knots That Actually Hold
A basic overhand knot slips on slick elastic cord. Use these instead:
- Surgeon's knot: Pass the cord through the loop twice before tightening. The extra pass adds friction so the knot grips. This is the standard finish for elastic bracelets.
- Double knot with glue: Tie a standard double knot, pull it tight, then add a small drop of clear craft glue or flexible fabric glue. Let it cure for at least 10 minutes before trimming the tails. You need both: glue alone won't hold a loose knot, and the knot alone won't hold slick cord.
- Wire loop finish: For beadable wire, bend the end into a small loop, twist the tail around the standing wire two or three times, and trim flush. No glue needed.
Cord Failure Modes to Avoid
- Waxy or over-stretchy elastic: If the cord feels slick or stretches more than about 30% of its length, it will lose tension and fail within weeks.
- UV and heat exposure: Elastic degrades faster in direct sun and hot cars. Store finished pieces in a drawer, not on a windowsill.
- Over-tightening wire: Wire kinks if you pull too hard, and a kink won't lay flat. Bend, don't yank.
For a first project, skip anything requiring crimp beads and jewelry pliers, elastic cord and beadable wire let beginners finish in under 20 minutes.
Silicone Bead Jewelry Making for Beginners: Your First Project
Silicone bead jewelry making for beginners works best starting with a wristlet: it teaches threading order, spacing, and knotting in one small, usable project.
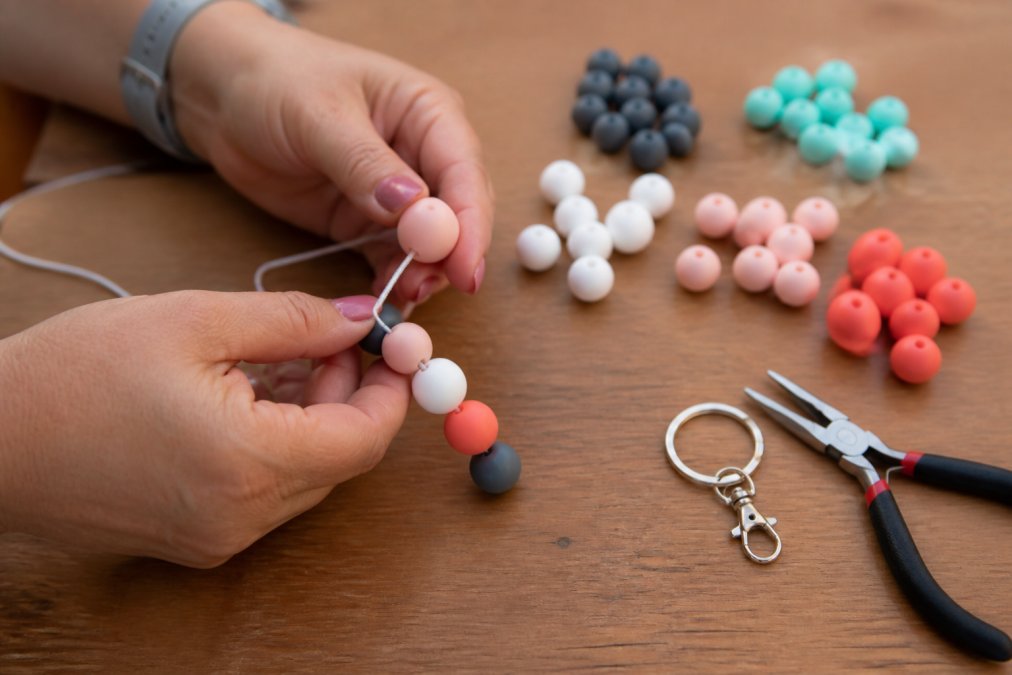
Step-by-Step Wristlet Assembly
Total time: 15-25 minutes Difficulty: Beginner
What you'll need:
- 10 inch beadable wire or 1 mm elastic cord
- 18 to 20 silicone beads (15 mm)
- 1 silicone focal bead
- 2-4 spacers or abacus beads
- 1 lobster clasp keyring
- Optional: jewelry pliers
Step 1: Lay out your pattern [2 minutes] Arrange beads on a flat surface before threading. Work from the center outward: focal bead in the middle, spacers on either side, then solids.
Step 2: Thread the beads [5 minutes] Slide beads onto the wire or cord in your laid-out order. Leave about 1 inch of slack on each end.
Step 3: Attach the keyring [3 minutes] Loop one end of the wire through the lobster clasp ring and twist to secure. For elastic cord, tie a double knot and pull tight.
Step 4: Finish and trim [3 minutes] Trim excess cord or wire. If using elastic, add a drop of clear craft glue to the knot and let it dry 10 minutes.
Expected result: A finished wristlet that fits a standard adult wrist.
Common Mistakes That Ruin a First Build
Four mistakes cause almost every failed first project:
- Threading without a layout. Beads end up clustered in one color instead of balanced.
- Cutting the cord too short. Always add 2 extra inches beyond what you think you need.
- Skipping the glue on elastic knots. The knot will work loose within a week.
- Over-tightening wire. It kinks and won't lay flat against the wrist.
Silicone Focal Beads for Keychains: Making Yours Stand Out
Silicone focal beads for keychains are the large, character or shape beads that anchor the design. Typically 15 mm to 30 mm, they come in printed, marbled, and shaped styles, set the color story, and give the piece a theme. On a beadable bar keychain the focal sits at one end; on a cup charm, at the bottom of the loop.
Color coordination matters more than focal size. Pick the focal first, then build surrounding beads from colors in its pattern. Two solid colors plus one accent pattern is the safest beginner formula.
To try a focal without committing to a full kit, a 15 mm Silicone Bead Mixed Bag at $7.00 includes focals alongside solids and printed beads, so you can test combinations first.
Safety, Cleaning, and Keeping Beads Looking New
Silicone beads are not all equal. Food-grade, BPA-free silicone is the standard for anything a child might handle, and it's what to look for on a product listing, but for kids' items, the material label is only the first checkpoint.
Children's Safety: What the Standards Actually Require
If a finished piece is intended for a child under 12, it is treated as a children's product, triggering federal requirements enforced by the Consumer Product Safety Commission (CPSC). Three points matter most for silicone bead crafters:
- Choking hazards: Small parts are regulated under the CPSC small parts standard, which uses a cylinder roughly 1.25 inches in diameter and 2.25 inches deep (cpsc.gov). Any component that fits entirely inside that cylinder is a choking hazard and must carry a warning for children under three. A 15 mm bead measures just over half an inch, so it fits easily. Never leave a finished piece with a toddler unsupervised.
- Phthalates and lead: Children's products are subject to limits on phthalates (under the Consumer Product Safety Improvement Act) and lead content (cpsc.gov). Reputable silicone suppliers publish test reports confirming compliance. Ask for them if you're selling finished items.
- Tracking labels: If you sell children's products, federal rules require a permanent tracking label on the product or packaging identifying the manufacturer, production date, and batch (cpsc.gov). This applies even to small craft sellers.
This is not legal advice, and requirements can change. If you plan to sell items for children, review the CPSC's current guidance or consult a qualified professional before listing.
Hardware Edges and Adult-Use Items
Lobster clasps and beadable wires can have sharp seams. Run a fingertip along the clasp before handing a piece to a child. For adult keychains and cup charms, the main risk is a loose knot or a wire end poking through a bag lining, trim wire ends flush and file them smooth.
Cleaning and Sanitization
Silicone attracts dust and lint, and finished pieces pick up skin oils and hand lotion. Cleaning is simple but the method matters:
- Routine cleaning: Wipe beads with a damp cloth and mild soap, then air dry. A soft toothbrush reaches the gaps between beads.
- Deeper cleaning: Wash with warm water and a drop of dish soap, rinse, and pat dry with a lint-free cloth. Don't soak.
- Why not to soak: Moisture trapped between beads and wire encourages rust on the metal components.
- Avoid prolonged direct sunlight: UV fades printed patterns and degrades elastic cord.
Storage That Keeps Beads Looking New
Store finished pieces flat in a drawer or soft pouch, not hanging on a hook where they can stretch, and keep them away from windowsills and hot cars. For unfinished beads, a divided organizer tray keeps colors separated and prevents printed patterns from rubbing.
Choosing the Right Bead Sizes and Colors
The standard size for silicone bead crafting is 15 mm, large enough to show pattern detail, small enough to fit a wristlet or pen barrel, and what most kits and hardware are designed around.
Sizing cheat sheet:
- 12 mm: Best for beaded pens and delicate keychains
- 15 mm: The default for wristlets, cup charms, and keychains
- 19-20 mm: Statement beads and larger focals
- 30 mm+: Oversized focals for bag charms
Color coordination follows one rule: pick a base, a contrast, and an accent. Base takes about 60% of the beads, contrast 30%, and the accent focal 10%, a ratio that keeps a design looking intentional.
If you're unsure which colors work together, order a mixed bag first. A 15 mm Solid Silicone Beads 20 pack at $2.00 per color lets you test combinations without buying a full palette upfront.
DIY Silicone Bead Kit for Beginners: What It Costs
A diy silicone bead kit for beginners typically costs $5 to $15 depending on what's included; kits with hardware and a focal cost more than bead-only packs.
| Item | Price | What You Get |
|---|---|---|
| DIY Beaded Pen Kit | $5.00 | Pen blank, focal, spacers |
| DIY 10 inch Wristlet Kit | $8.00 | Wire, clasp, 18 beads, focal |
| DIY Tumbler Cup Charm Kit | $10.00 | Two 8 inch wires, beads, focals |
| 15 mm Silicone Bead Mixed Bag | $7.00 | 30-60 beads, some focals |
| 15 mm Solid Silicone Beads 20 pack | $2.00 | 20 beads, single color |
| Silver keyring with lobster clasp | $0.60 | Hardware only |
| 8 inch beadable charm wire (10 pack) | $4.00 | 10 wires |
A kit at $5 to $10 gets you to a finished project; buying components individually costs more per project until you're making several pieces at once. Once you're producing multiple items, wire in a 10-pack at $4.00 and beads in 20-packs at $2.00 drop your per-project cost significantly. For beginners, one kit plus one mixed bag is the smartest start.

Conclusion
Most beginners quit silicone bead crafting because they buy the wrong supplies first: mismatched beads, cord that snaps, hardware that doesn't fit. A pre-matched kit removes that friction.
Barkers Creative Designs builds kits around that problem. The DIY 10 inch Wristlet Kit and DIY Beaded Pen Kit include everything for a single finished project, and the 15 mm Silicone Bead Mixed Bag gives you variety once you're ready to design your own combinations, all priced for hobbyists testing the craft, not just small-batch sellers.
Search the Barkers Creative Designs catalog to find your first kit and start your first project this week.
Frequently Asked Questions
What type of cord is best for silicone beads?
Stretchy elastic cord works for bracelets, but for keychains and wristlets, a 1 mm braided nylon or coated wire holds its shape better under daily use. If you are threading 15 mm beads onto a beadable charm wire, the wire itself is the structure, so no cord is needed. Match cord thickness to bead hole size, and always double-knot or use a crimp bead to lock the ends.
Are silicone beads safe for jewelry making?
Look for BPA-free, food-safe silicone, which is what quality suppliers list on their product pages. This matters most for items kids handle, like keychains and wristlets. Avoid unknown sellers who cannot state the material. Silicone is soft, wipes clean with mild soap and water, and does not crack the way some plastics do, so it holds up well for everyday accessories.
What tools are essential for a beginner silicone bead kit?
Most starter kits need no tools at all. A beadable pen kit screws together by hand, and a wristlet kit slides beads onto pre-cut wire. Jewelry pliers help with tightening knots and crimp beads, and a small bead reamer clears any blocked holes. Start with a kit, add pliers later if you move into cord-based jewelry making. A shallow tray keeps beads from rolling off the table.
What can I make out of silicone beads?
Keychains, wristlet lanyards, beaded pens, tumbler cup charms, crochet hook handles, and stylus pens are the most common beginner projects. A 10 inch wristlet kit makes a keychain in one sitting, while a tumbler charm kit builds two 3 inch round charms. Once you are comfortable, mix solid beads with silicone focal beads to create custom designs for gifts or small-batch selling.
Will silicone beads melt in heat?
Silicone tolerates far more heat than most craft plastics and does not soften at normal room or car temperatures. Leaving a beaded keychain on a sunny dashboard for weeks is different from brief heat exposure, and prolonged direct sunlight can fade colors over time. Wipe items clean with a damp cloth and store them out of constant direct sun to keep the finish and color intact.