
Best Ways to Organize Craft Beads: 7 Systems That Work
Table of Contents
- Why Your Bead Stash Needs a Real Organizing System
- Bead Storage Containers: Stackable Towers, Compartment Boxes, and Vials
- Organizing Seed Beads by Color: Color-Coding Systems That Stick
- Small Space Craft Room Organization: Vertical Storage and Portable Caddies
- Best Acrylic Beads for Jewelry Making (and How to Store Them)
- Labeling, Inventory, and Reorder Points for Your Bead Stash
- Protecting Your Beads Long-Term: Tarnish-Resistant Storage and Material Care
- Frequently Asked Questions
Last Updated: September 17, 2026
Why Your Bead Stash Needs a Real Organizing System
The best ways to organize craft beads start with one honest admission: a pile of loose bags on a shelf is not a system, and learning how to organize craft beads properly begins there. The real cost is duplicate purchases, tangled findings, and abandoned projects.
Bead Storage Containers: Stackable Towers, Compartment Boxes, and Vials
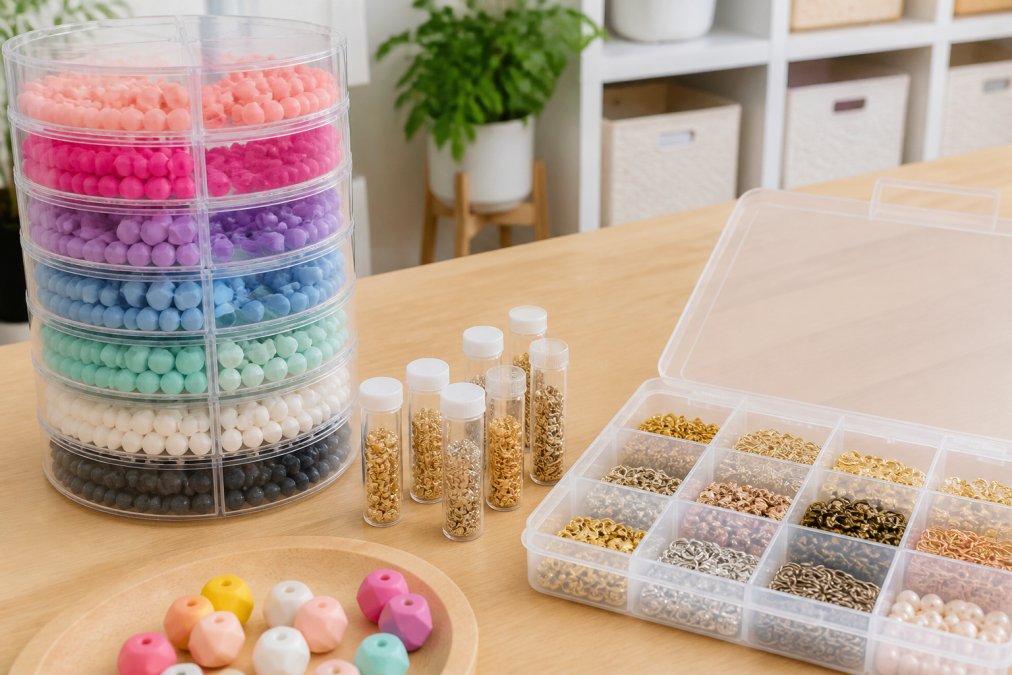
Bead storage containers fall into three families: stackable towers, compartment boxes, and vials or tubes. Each solves a different problem, and most crafters use all three.
Stackable Containers and Bead Towers
Bead towers and stackable containers win on vertical space. A tower of clear, screw-together jars lets you see contents without opening anything. Assign one jar per bead size or color family, and keep the tower on your craft desk, storage you have to walk to stops getting used within a month.
Plastic Vials and Bead Tubes for Findings and Spacers
Plastic vials and bead tubes handle the small stuff: findings, rhinestone spacers, lentil spacers, and anything under 14 mm. A mixed bag of 40 lentil spacers poured loose into a compartment box becomes a sorting project. The same bag emptied into two or three vials stays usable.
Organizing Seed Beads by Color: Color-Coding Systems That Stick
Organizing seed beads by color works best with a fixed, physical code rather than a mental one. A 10-gram bag of one shade looks nearly identical to its neighbor under warm light, so give every color a permanent home and a visible marker.
A system that sticks usually has three parts:
- Sort by color family first, then by finish (matte, metallic, opaque).
- Assign each family a compartment, jar, or tube that never changes.
- Mark the container with a swatch of the actual bead taped to the outside.
Sorting and Categorization Strategies
Sort in small batches, never the whole stash at once. Pull one bag, sort it, put it away, then pull the next. For mixed bags, sort onto a shallow tray with a lip so beads do not roll onto the floor.
Small Space Craft Room Organization: Vertical Storage and Portable Caddies
Small space craft room organization comes down to two moves: go vertical, and keep a portable layer for active projects. But the usual "use a pegboard, get a caddy" advice skips what determines whether the setup works: reach distance and sightline. Storage you cannot reach without standing stops getting used within a month; storage you cannot see stops within a week.
Design Around Your Reach Zone, Not Your Wall Space
Before buying a single rack, measure the space you actually work in. The ergonomic rule most crafters land on:
- Primary zone (arm's reach, roughly 18-24 inches from your seated position): the beads and tools you touch every session. This is where your bead tower, your most-used vials, and your pliers live. Nothing in this zone should require standing.
- Secondary zone (one step away, roughly 3-4 feet): beads you use weekly but not every session. Shelf risers, a second tower, the findings box.
- Archive zone (across the room or in a closet): seasonal colors, bulk backstock, and anything you have not touched in a month. Labeled bins only.
Vertical Storage That Earns Its Wall Space
Wall-mounted storage is the highest-return upgrade in a small craft room, but only if it respects the reach zone. A shallow shelf 12-18 inches above the desk holds bead towers at eye level; a pegboard behind the desk takes spools, scissors, and loop turners off the work surface.
Portable Bead Caddies: Buy for the Project, Not the Stash
A bead caddy is a small case with compartments and a handle. Load it with the beads, spacers, and findings for one project, and you can work anywhere without hauling your whole stash. It also doubles as a project staging area, keeping unfinished work off your main desk.
Lighting and Sightline
Vertical storage only works if you can see into it, which is why clear containers beat opaque ones in the primary zone. If you must use opaque bins, label the front face, not the top, so you can read it while seated.
Best Acrylic Beads for Jewelry Making (and How to Store Them)
Acrylic beads are lightweight, hold color well, and cost less than glass, making them practical for keychains, wristlets, and beaded pens. The trade-off: acrylic scratches more easily than glass and can dull with rough handling.
Labeling, Inventory, and Reorder Points for Your Bead Stash
Labeling and inventory management separate a stash that stays organized from one that collapses every three months. A label tells you what is inside; an inventory tells you how much is left; a reorder point tells you when to buy more before you run out mid-project. Most guides stop at the label, which is why crafters keep rebuying the same 12 mm spacers.

Build a Three-Layer Label System
A single label type does not survive a real stash. Use three layers, each doing a different job:
-
Identity label, what the bead is. Size in millimeters, finish, and color family. Write it as
12 mm / matte / sage, not "green spacers." Size first, because that is the field you search by when you are mid-project. - Swatch label, a single bead taped to the outside of the container. Dye lots shift between orders, and a written color name like "dusty rose" tells you nothing when you are holding two similar bags side by side. The physical swatch is the tiebreaker.
-
Quantity label, a small strip of tape or a sticker you overwrite with a marker each time you pull beads.
~40becomes~25becomes~8. This is the layer almost everyone skips, and it is the one that prevents the mid-project stall.
Digital Inventory Tracking: The Layer Most Guides Skip
Physical labels tell you what you own, not what you are about to run out of. That is a job for a digital inventory, the single biggest upgrade most bead stashes are missing.
- A spreadsheet (Google Sheets, Excel, or Numbers), best if you want full control and offline access. One row per bead type, columns for size, finish, color, quantity on hand, reorder threshold, and supplier.
- A notes app with checklists, best if you want zero setup. One note per storage zone (tower, vial drawer, findings box), with a checkbox line per bead type and the quantity written after it.
A workable spreadsheet structure looks like this:
| Column | Example Entry | Why It Matters |
|---|---|---|
| Bead ID | 15S-SOL-SAGE |
Short code you can write on the lid |
| Size | 15 mm |
Primary search field |
| Finish | solid |
Distinguishes from printed and focal |
| Color | sage |
Secondary search field |
| Qty on hand | 34 |
Updated after each project |
| Reorder at | 15 |
Triggers a buy |
| Supplier / SKU | BCD-15SOL-SG |
Speeds reordering |
Set Reorder Points That Actually Trigger
A reorder point is the quantity at which you buy again. Too low and you run out mid-project; too high and you tie up money in duplicates. The workable rule for most crafters:
- Small components (spacers, seed beads, findings): reorder at one-third of a typical pack. If a pack is 40 lentil spacers, reorder at 13.
- Focal and statement beads: reorder at two to three pieces remaining, because you rarely need more than one or two per project and a stockout is easy to work around.
- Core size beads (the 15 mm solids you use in almost every project): reorder at half a pack. These are the ones that stall an order.
A Five-Minute Maintenance Routine
An inventory only works if it stays current. The routine that survives real life:
- After each project, update quantities for the beads you used. Two minutes.
- Once a month, spot-check three containers against the sheet. If two are off, do a full recount. Five minutes.
- When a quantity hits its reorder point, add it to a running shopping list rather than buying immediately. This batches orders and cuts shipping.
- Once a quarter, pull anything you have not touched in a year and either use it, gift it, or move it to a "someday" bin outside your main stash.
Protecting Your Beads Long-Term: Tarnish-Resistant Storage and Material Care
Long-term preservation is the angle most bead storage guides skip. Metal tarnishes, silicone fades, acrylic scratches, none of it dramatic if you store materials correctly from day one.
A quick preservation checklist:
- Metal findings in sealed bags or lidded vials, away from moisture
- Silicone beads out of direct sunlight
- Acrylic beads separated from metal components
- All containers lidded and labeled
- Stash stored in a dry room, not a garage or damp basement
American Craft Council resources on materials and craft practice
Frequently Asked Questions
What is the best way to store seed beads?
Seed beads work best in shallow, compartmentalized containers or plastic vials with tight lids. Group them by color family so you can see what you have without opening every container. A bead scoop helps you pull just the amount you need. Keep seed beads away from direct sunlight, which fades dyed colors over time. For small spaces, a stackable bead tower with individual tubes keeps seed beads visible and contained.
Should I organize my beads by color or by size?
Most crafters organize by color first, then by size within each color group. Color is what you reach for when designing a piece, so organizing seed beads by color speeds up your workflow. Size matters more for structural decisions like whether a bead fits a cup charm wire. If you make silicone beaded items, separate 15 mm solids from 12 mm lentil spacers so you do not grab the wrong one mid-project.
How do you keep track of bead inventory?
A simple spreadsheet or notes app works for most hobbyists. List each bead type, size, color, and quantity on hand. Set reorder points so you know when you are running low on a color you use often. Digital inventory tracking beats a paper list because you can search it on your phone while shopping. Update counts after each project, and note which items are discontinued so you can stock up before they sell out.
Are clear plastic containers best for bead storage?
Clear containers win for visibility, but they are not the only good option. Acrylic organizers and clear plastic vials let you see colors at a glance without opening lids. The trade-off is light exposure, which can fade some materials over years. For long-term material preservation, store rarely used beads in opaque bins or a drawer. Keep everyday beads in clear stackable containers for easy access.
A disorganized bead stash quietly costs you money, time, and finished projects. Barkers Creative Designs carries the containers-friendly essentials that make a system work: 15 mm solid and printed silicone beads, 12 mm and 14 mm spacers, wide-hole rhinestone spacers, and mixed bags with focals, all food-safe and BPA-free. Start with one tower, one vial set, and one written reorder list. Explore the Barkers Creative Designs catalog and build a stash you can actually find things in.